Assignment 4 – Rich Multimedia Lesson Group Project

A Lesson on Python Basics

By Yasmin Evans and Hongxi Li

Getting Started

As technology continues to creep ever more into our daily lives and workflows, learning to code has become a workplace and leisure goal for many. Coding allows those proficient in it to create scripts for anything from daily schedule rituals to controlling robots and taking heart monitor calculations, its versatility and variability is what generates so much value for its users and is what continues to drive people’s desire to learn the skill. 

What is Python? And Why Should I Learn It?

Python is a general use coding language like C and Java. It has an extensive library of importable functions and scripts which have given it many development capabilities in things that would have otherwise required multiple languages to create. Unlike Java and C which also have extensive libraries, Python’s simplicity and learnability have catapulted it into being one of the most popular programming languages among beginners and fully fledged developers alike. By learning Python you will be grounding yourself in coding basics through the use of its simplistic coding syntax and rules, while also setting yourself up to learn more advanced coding languages through its transferable logic. 

Using Python

To get started with Python, first you need to make sure you have the correct environment for the coding language. Python requires the Python.org application files to be present on a system before code can be written or run, although due to pythons versatility applications which host python and its many external libraries such as Anaconda can also be downloaded in lue of only the python application. 

Python.org python Download page

Using the Python.org website, select the correct Python download based on your system. 

or

Download Anaconda based on your computer specs

Anaconda Download page

Once python has been installed in one of the two above ways, you will need to download a text editor so you can write and save your code. Text editors that work with python include: VSStudio Code, Wing, Notepad++ and Atom. 

Create documents using the text editors create text file option, usually located in the top left hand corner regardless of application. Always be sure to save python files with a .py at the end so they compile correctly.

Alt text: Image of file explorer on Windows 11 machine

Python does not require the use of a manual compiler command, using either the editors terminal or your computer’s CMD (while inside the file containing your .py file with the cd command) run your code using the command “python filename.py”. 

Alt text: Image of python code being run in VSStudio Code

Hopefully, you’ve downloaded a suitable editor, so let’s try using it!

1. Open the editor (Wing as an example).

2. Click on the link below for some test code.

https://python-fiddle.com.

3. Type the test code into your text editor.

4. See if the output of your input code is the same as ours.

Alt text: Python Fiddle application with test code

Alt text: Wing Text Editor with test code

It’s perfectly ok if you don’t get the answer you were hoping for, relax, our learning has just begun.

Python Syntax

Python, like any other coding language, requires specific formatting and handling rules be followed in order for its code to run as intended, these formatting and handling rules are termed syntax in the coding world. Python’s coding syntax rules are generally straightforward and can be split into two categories, formatting and assignment.  

Formatting: 

  • Indentation: Indentation is required to tell blocks of code apart from one another. If indentation is skipped the file will not compile properly, and will not run as a result. Use the tab function to create indentation for arguments inside of arguments.

Alt text: image showing an indented sentence

If, Else, While and For statements require that before an indented internal block of code is created below them they end in a “:”. 

Alt text: image showing a while block example with an ending”:”

  • Statements: Tying into indentation, when code statements in this language come to an end, a new coding statement must be created elsewhere on the document, single line programs are not feasible using python code. 

Alt text: image showing several lines of independent code

  • Commenting: The # sign is used for commenting code blocks. For any code you do not wish to run upon compilation, using the # sign before it will ensure it is ignored by the compiler. Normally, comments are placed in spots to define a function of concept to a developer who may not understand the flow of the code from a glance. 

Alt text: image showing a comment with the use of #

Test your understanding of Python syntax!

Assignment: 

The main form of Assignment in python is done through Pythonic variables using the “=” sign to assign a value of some sort to a variable (usually a single letter or word/words) to be utilized in the code blocks below it. Occasionally, assignments can also be done through the use of libraries and clever coding implementations, but we will not be going over such advanced topics in this lesson.

To start, we must first create the variables which we wish to assign values to. Variable names cannot contain any spaces, furthermore it is generally discouraged to include special characters such as !@#..ect, as they may confuse the compiler since these characters can also be used for calculation purposes. Naming conventions are a topic in of themselves as many programmers opt to name variables differently depending on their use in the program, for the uninitiated, as long as a single naming convention is used throughout for the base variable types there is no issue, such naming conventions include:

  • snake_case: Where words are separated using _’s

Alt text: Snake Case example

  • camelCase: Where the first word is lowercase and words after it are upper case

Alt text: Camel Case example

  • PascalCase: (the most frequently used case) Where all new words are differentiated using uppercase letters. 

Alt text: Pascal Case example

Test your understanding of the types of naming conventions!

There are MANY values that can be assigned to variables, including the natural pythonic variables, which are found in the basic python coding language, as well as variable types that can be imported using libraries. For the sake of this intro to python we will focus on the most basic natural pythonic variables that require no imported libraries or the use of classes to utilize as shown in the below infographic:  

Alt-text Infographic about python primitive types: This infographic talks about the 4 key types of primitives used in python, from top to bottom integers, floats, strings and bools.

Test your understanding of the natural python types!

Common Python Functions and Operators

As mentioned in the intro paragraph, python is an incredibly versatile language that hosts many natural functions as well as functions that can be imported using libraries. The most utilized functions in all high level coding languages revolve around the core 4; Printing, If-Else logic, While Loops and For loops. For the sake of brevity, and because these functions are utilized in basically all code between beginner and advanced level understandings, we will be covering these core functions only. In general, before using one of Python’s natural functions, defining a function name to hold the natural function is preferred, to do this use”def functionName()”, in the below examples we use def code() when necessary.

Operators are required to perform operations so the code can evaluate outcomes, they follow the same rules as basic arithmetic. Such operators include the +, – and = signs which mean exactly the same as their arithmetic counterparts. 

Print Function: The print function takes input directly from the coder and prints said input to the console (or terminal) after the program has been compiled and run, an example of the print statement and it’s terminal output can be seen in the below screenshot: 

Alt text: image of a terminal running the print statement “Cats are my favorite animal”

If-Else Logic: If proceeds a statement that will only run its indented code if the statement is true, else can only be added at the end of an If statement to cover the cases that did not return true. An example of an If-Else statement can be seen in the below screenshot:

Alt text: image of an If Else logic code block

While Loops: While loops are snippets of code that run on repeat until a certain condition has been met, they require that the condition be worked towards each time the while loop repeats such that an infinite loop is not caused, below is a screenshot showing a basic While Loop structure. 

Alt text: image of a While loop code block

For Loops: For loops work a lot like while loops, but rather then having their condition being updated using a variable that the loop is working with, external variables like i, j and k are used instead to dictate exactly how many repeats the loop has until it finishes, an example of a for loop can be seen in the below screenshot. 

Alt text: image of a For loop code block

Basic Python Project

Now that you have a general base for how to code in python, below are a few coding exercises meant to strengthen your understanding of the content and test your learning thus far. Please complete one of the exercises using your text-editor and knowledge from this lesson, then submit your work to brightspace as a .py file. 

Calculate the sum of numbers 1 to 100: Write and run a python script which calculates the sum of the values 1 to 100 like follows: 1+2+3+4+…+99+100

Or

The Iterative Stars Project: Using for loops, given a number of rows, create a pyramid of stars with that number of rows, but in each row an additional star appears, example output is shown below for the number 11 as input: 

OUTPUT:

x x 

x x x 

x x x x 

x x x x x 

x x x x x x 

x x x x x x x 

x x x x x x x x 

x x x x x x x x x 

x x x x x x x x x x 

Further learning

If you want to learn more about python, here are a few sites we recommend for beginners to continue on their python learning journey.

1. Python Tutorial (w3schools.com)

W3Schools offers an extensive Python tutorial tailored for beginners. It covers fundamental aspects such as syntax, data types, control flow, functions, modules, and object-oriented programming. The platform enhances learning through interactive exercises and examples, allowing beginners to grasp Python programming intuitively. We recommend it because its layout is clear and easy to understand, and the built-in Python editor is easy for newcomers to get started, also it is totally free.  The only problem may be that it is only suitable for beginners, the content is relatively basic, and it is less helpful for further learning.

Alt text: W3 School Python Programming Data Types Page

2. Practice Python 

Practice Python is also a Python learning platform that offers more than 40 different Python exercises, and each exercise includes a question and the solution. The advantage of this website is that it provides a large number of Python exercises to help users apply what they have learned to real-world scenarios, thereby deepening their understanding and memory of Python programming concepts. It’s also completely free! It should be noted that this website only provides practice questions and answers, and there is no tutorial on related knowledge. It is suitable for those who have learned part of Python and want to practice.

Alt text: Practice Python Exercise 7 page

3.Python Exercises – Python Tutorial (pythonbasics.org)

Python basics is more balanced than the previous two sites, it provides an explanation of Python knowledge while ensuring practice content. It also happens to be free.

These sites cover almost all the common Python knowledge and are perfect for beginners, so if you can’t wait, then start exploring them!

Methods for Successfully Learning More Python

1. Keep learning and practice in sync: It is not enough to just read the tutorial, what is important is a lot of practice and application. It is recommended that you start practicing a subject as soon as you have finished studying it.

2. Find yourself a hobby: We recommend you find a project that interests you so you can learn and solve problems by doing.

3. Join the community: Learning to program is not a lonely endeavor, and you can join Python-related forums or communities to exchange ideas with other learners.

4. Continuous learning: Programming is a continuous learning process, and continuous learning is very important as technology is updated and iterated quite quickly.

Reflection: 

The general outline for this lesson plan as well as the content in the sections Getting Started, What is Python? And Why Should I Learn It?, Using Python (up until the sub-section describing using downloaded applications to ensure they work correctly), Python Syntax, Common Python Functions, Basic Python Project and the HP5 syntax quiz as well as the HP5 formatting quiz were created by Yasmin. The infographic of Python Primitive Types, quiz for the infographic made using H5P, Further learning section, methods for successfully learning more python section and the portion of Using Python content describing using the coding applications to ensure that they work correctly were created by Hnasey.

We created our lesson layout based on the learning objectives and constructive alignment lesson plan template found in Module 4, our lesson plan can be found in the chart below. Constructive alignment and backwards design greatly influenced our current lesson plan layout. We knew we wanted students to complete a coding assignment at the end of of the lesson as that would be the best method of evaluating whether students had the base we had envisioned for them in Python, which was our ultimate learning goal. Constructive alignment for us meant making sure each learning activity was made to move our students towards understanding all the smaller concepts in Python so they could ultimately create what was assigned at the end and prove their knowledge.

Big Idea   
What is the big idea that the learner will walk away with at the end of the lesson that is critical for learners at this stage of their learning path? 
Learning Outcome(s) What specific things will the learner know or be able to do by the end of the lesson? Evidence of Learning What does learning look like for this objective? (e.g., accurate performance of a task, correct use of terminology)Assessments What will learners do to provide evidence of their learning? (e.g., a presentation, a test, a project)Learning Activities What learning activities will allow learners to acquire and practice the skills necessary to demonstrate their learning and complete the assessment successfully?
Since this is a total beginners intro to Python, we want the learner to walk away with a strong core foundation in the Python coding language, such that they will be able to build on this information easily if they decide to further their knowledge of the language. 

Know why learning python is valuable as a skill

Understand basic pythonic syntax

Understand basic pythonic variables and variable allocation

Be able to create simple programs to solve entry level coding problems 
Correct understanding of syntax and variable allocation in assigned python coding task

Accurate understanding of how functions in assigned work. 
Create and submit a .py document with their solutions to the assignment questions. 

Get a score of 5 or higher across the HP5 quiz’s.
 
Write code in to solve the provided assignment questions. 

Test their understanding of using the HP5 quizzes provided.


We used multiple types of media when creating this lesson plan, we had WordPress HP5 content to test students in multiple areas including HP5 tests for Variables, Syntax and Naming Conventions. The layout of this HP5 content varied from drag and drop to matching words to their definitions as we didn’t want the material to become repetitive for students. We included a Canva made infographic to teach students the different types of variables prior to the related HP5 testing material, when creating this infographic we focused on alignment, proximity and color so as to best hold the attention of our students. Regarding external media, we decided to incorporate Python-Fiddle into the lesson. This site allowed us to create practice pieces of code without making students download .py files to run, rather all they needed to do was open the web to view the code and create based on our test code. Finally, but still importantly, we included many screenshots and images to hopefully assist the students in following along with the content. 

In general, during the creation of our lesson plan we made sure to focus on including the following principles, theories, and techniques such that students would be able to get the most out of learning the basics of Python! We attempted to stay on topic and generate a cohesive flow throughout the lesson in an attempt to halt our students from getting cognitively overloaded with unnecessary information. This meant using signaling and segmenting on content as well as consistently placing like content next to like content for the sake of overall contiguity. We found that our lesson content was very writing heavy which made the intrinsic cognitive load hard to balance at first, we settled on breaking up the concepts with related images and activities as recommended by the dual coding theory in order to soften the intrinsic load on students. Dual coding also allowed us to pre-train students for upcoming related HP5 activities which were not only used to segment content, but were also aimed at creating an active learning environment for students. Extraneous load was avoided by actively avoiding repetition in text and images to the best of our ability. We’re hoping that a balanced germane load was created through our efforts to incorporate these theories and principles.

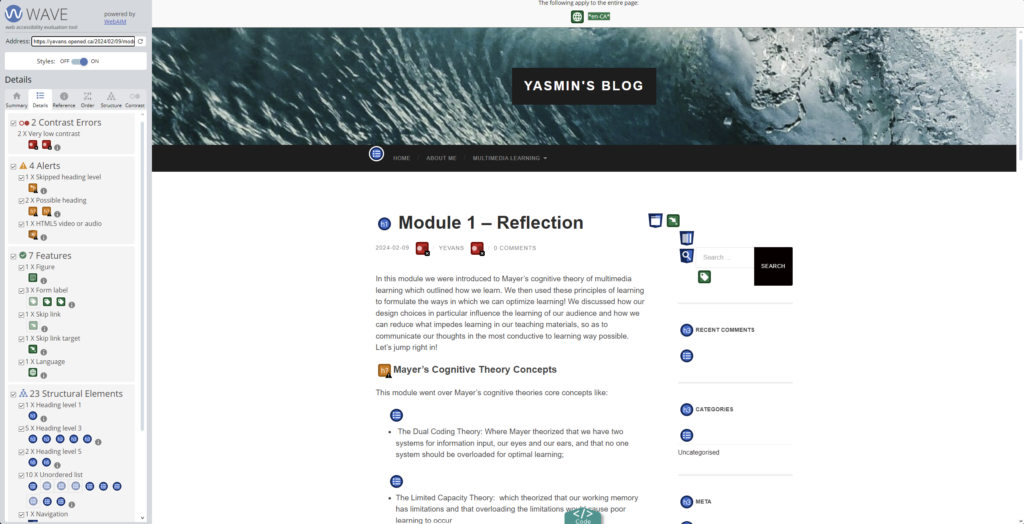
For the sake of accessibility and representation we ensured that all images had an alt text. After completing our lesson plan we ran a WAVE Accessibility check on the content and found that it passed the check after minor alterations.

For the most part the content in this lesson plan comes from our collective knowledge as computer science students about the subject of coding in Python, however the following sites and sources were used to enrich our understanding of the topic, were mentioned during the lesson or were used as external media: 

Written Content Sources:

Rossum, G. V., Warsaw, B., & Coghlan, A. (2013, August 1). PEP 8 – style guide for python code. Python Enhancement Proposals (PEPs). https://peps.python.org/pep-0008/#naming-conventions 

Websites mentioned in images/content not otherwise hyperlinked:

https://python-fiddle.com

https://www.python.org

https://www.anaconda.com/download/

https://www.w3schools.com

Module 5 – Reflection

In this module I was tasked with understanding generative AI and exploring its capacity for the classroom. We explored how new technology can be structured around learning and not vice versa using the TPACK and SECTIONS frameworks, so students can remain engaged with content while also not missing out on utilizing the newest tools. AI’s capacity for writing and generating information was also explored as a possible integrity issue which poses a problem for students and educators alike. AI seemingly appeared out of nowhere and left many people, educators especially scrambling to keep up and regulate it. But it doesn’t have to be a hindrance on learning, rather it can be an amazing tool to bolster learning if used correctly.

Generative Artificial Intelligence and Education

When I first became aware of generative AI I was a second year student here at UVIC. I recall a university wide letter being sent around to students warning us of the integrity violations you could accrue if you utilize any form of AI software for any means, anywhere from failing a course to being expelled were noted punishments. Since I had little knowledge of AI and I had been told its use in an academic setting was forbidden, I have never thought to use it towards the betterment of my learning, instead I learnt to avoid it and any AI-like platforms. I do understand where the university was coming from when it came to limiting the use of AI at that time, as very few regulations around the use of AI had been made. Nearly three years after OpenAI’s big release however, this has been the first class I have been in that has not only encouraged my use of AI, but has also taught me the skills to properly cite it as a source, and has given me basic AI literacy. 

I was able to explore tools in this class that I haven’t thought to touch or that i even knew existed such as Stable Diffusion below:

Fig. 1 “cute frog cowboy” prompt, Stable Diffusion, version Stable Diffusion XL, Black Technology LTD., 30 Mar. 2024, stablediffusionweb.com/.

The AI tool I decided to explore was Stable Diffusion. I am not an artistically inclined person, so drawing things even remotely like what this tool can generate is way out of my depth. I also happen to have a condition called aphantasia which means I cannot see images in my head, using stable diffusion was like outsourcing my imagination in a sense! I enjoyed the thrill of having no idea what type of images my prompts would generate, and seeing the final piece rarely disappointed! I will admit however, I was a little put off by having to use my personal email to use the Stable Diffusion application. I’m hoping that I can delete my account info from the site after I am done using it in the future. 

Generative AI, when used properly can be a fantastic educational tool, it can be used to summarize long form writing, generate ideas, check spelling and grammar, and create discourse to further discussions. It’s also an amazing tool for self expression and art when used correctly. I’m happy that in my time at university I have had the chance to be in at least one class where generative AI has been taught as a tool for learning, rather than villainized and pushed to the wayside.

SECTIONS Analysis for OpenETC

I decided that I would do a SECTIONS analysis on the OpenETC site utilized in this course, to see how it measures up to the requirements set for media in learning: 

Students: 

The students using this media are the EDCI 337 students and online people who happen on the blog and take an interest in reading through its content. In order to reach the blog a person will need to have an internet connection and a device to work on, this can be a personal device, a shared device or a public device. Access to a device may still be an issue for some students with limited funds or transport options. 

Ease of Use: 

The OpenETC site generator is easy to navigate and use because it uses WordPress to host its sites. WordPress has many online resources and tutorials for website creation, as well as in application tutorials for creating your first site. OpenETC sites are reliable so long as the student has an internet connection and the WordPress servers remain up. However, access and navigation throughout the sites may require basic internet literacy. 

Cost: 

OpenETC is a free to use educational website creation platform, as such the only monetary costs in generating sites come from the hours spent by users personalizing their sites. Since the sites are hosted using WordPress, it is likely future infrastructure will be supported in the long term, and maintenance will be performed on the backend when needed. There is a privacy cost associated with OpenETC. In order for students to sign up and create their own sites their school emails are used, which in the case of a data leak could cause their personal information to be compromised. The cost of a personal device to a student may also factor into the price of using this application for some students. 

Teaching: 

Student websites support teaching through the reflective analysis of ideas, which allow them to draw conclusions on their own and make connections to other aspects of their lives, schooling or thoughts. Based on the content of this course, a blog was the perfect form of media to use as it displayed the use of multimedia tools, but also acted as the ground where students would be implementing those same tools on their own sites. Desired learning objectives could then be measured through analyzing student blogs. Since most university students have access to a device with an internet connection at home or in a public space like the UVic library, the bar to entry of teaching using this platform was low. 

Organization: 

OpenETC is not provided by the University of Victoria, and is instead an open source educational website creation platform hosted through WordPress. It is available free of cost to the university, and therefore doesn’t have any support through the university. Although the library does not have information regarding OpenETC and wordpress, the internet has a plethora of information, and the OpenETC website also hosts information regarding the site building tool.  

Networking: 

OpenETC allows for websites to be posted directly to the internet, and thus anyone who wishes to access a site and who has a link can do so. Communication between people is facilitated on OpenETC by allowing those with sites to share posts on each other’s platforms. As the sites can be set to be viewable on the internet, people interested in a site’s content may also be able to reach out to a student or professor regarding their work. 

Security: 

WordPress as a site does hold some responsibility for the information given by students in order for them to create their sites, namely that user data will be securely handled when an account is made. However, as OpenETCs websites are fully customizable, students also bear some responsibility in protecting their own privacy, and not oversharing their details. 

According to the above SECTIONS analysis, the OpenETC site is suitable for use in this course, and inductive to learning for the type of educational content explored. 

Ethical and Academic Considerations

Every other week there appears to be another AI company being sued for the use of data to train their systems that wasn’t theirs to take in the first place. Just as stolen work has consequences in the real world, academic consequences for stolen AI work should be dealt with in a similar manner. Luckily for students, in order to avoid academic infringements there are now ways to cite AI sources. This has opened the door for students to start being able to use this new and exciting technology to further their learning endeavors, but not without caution of course. As was noted in this module AI does have a record of being incorrect 10%-20% of the time, thus students must be taught to be wary of the information AI gives them, and to do their due diligence. Universities appear to be slow on teaching their students how to properly use and cite AI which will affect them as they leave university and enter a world ever increasing in AI influence. Promoting the safe use of AI in schools benefits students, as once they are out in the world it will be at their fingertips. Barring them from this tool set out of ignorance or the desire not to use new technology will put them behind their tech savvy peers and force them to learn the technology at an expedited rate upon leaving for the job market. 

Given what I know now, and having finally experienced using AI technology in my learning environment after 2 years of it being out of my reach, I will definitely be using AI and other technologies to my own advantage during my learning journey, and the learning journeys of those I facilitate.

Module 4 – Reflection

In this module I was tasked with understanding instructional design concepts such as constructive alignment and backwards design for lesson planning. I was also tasked with learning about active and passive learning, and reflecting on how lesson planning combined with active and passive learning and Miller’s concepts creates a landscape indicative to learning for students.

Instructional Design and Active Learning

Constructive Alignment and Backwards design struck a chord with me, they seemed like obvious concepts that I couldn’t believe I hadn’t had the forethought to use while creating the learning objective based lesson plans I had in the past. Not once have I thought to work backwards to ensure my learning activities worked towards my curriculum goals, but knowing what I know now I’ll be utilizing backwards design and constructive alignment far more often during future lesson planning.  For now however, I can only reflect on my past teaching experiences and evaluate where I did and didn’t go wrong without the use of backwards design. 

During my stint as a junior museum camp educator I found myself attempting to work towards many learning outcomes for the children I looked after, like learning about mining techniques, minerals and our general town history. I have felt the frustration of having taught information to kids and performed gamified quizzing based on my assigned learning objectives only to have them not understand what I had taught them, or forget the information entirely. I have fallen into having the kids create decorations and crafts after failed attempts at motivating them to learn, which I realized at the time isn’t indicative of learning or moving myself or them towards my objectives. Where I had some success was during the hands-on exercises we had at the museum, such as taking the children into the mine shafts and telling them stories about how minors would send in canaries, teaching them to gold pan and showing them the rare minerals which exist in the mountainside. All these activities seemed to create more buzz amongst the kids as well as lasting impacts on their knowledge, as opposed to the silence I would receive asking a question after a lecture about mining. Had I maybe worked backward from my desired learning outcomes, maybe I would have had the ability to balance the fun of active learning with passive learning to generate the most value for the kids while also hitting my learning targets. 

Given what I know now about backwards design and constructive alignment, I have attempted to create a lesson plan about the topic of growth mindsets: 

My experience with Active and Passive Learning 

For the whole of my highschool experience and nearly all of my university schooling I have been presented with the same passive content the writer of “To learn students need to do something”’s children were presented with, presentation slides, and the occasional offhand comments to write down key points made by educators. I have rarely experienced professors who allow for discussions and the utilization of students for demonstrative purposes. Although, I will note that in my experience, university professors are better at incorporating novelty in their movements during lectures than my highschool teachers (though this may have been due to space limitations). 

In the few university classes where I have had professors who have utilized a balanced amount of active learning and passive learning I have found that my engagement with the material increased, I made better connections to the topics, and my recollection of information increased. I recall a professor who would break up their flow after key points had been addressed during lecture, and would allow for students to talk amongst themselves for 5 minutes before posing a question and waiting another 5 minutes for us to deliberate on the topic. The class this  professor taught also happened to have the highest level of engagement I have seen from students during my time in university. Conversely, another professor I have had worked solely off of passive learning, they would read a slide deck for an hour and a half and then pose questions to the class at the end. This professor had very little class engagement, which it appeared she took to heart as the semester passed. Her questions began to come across as hostile as people would be disengaged and wouldn’t answer. Ultimately many people stopped attending that class, myself included. 

There is definitely a balance between active and passive learning, finding the right amount of core information to passively give students as well as allowing them time to disseminate the information and create connections is a skill teachers need for their students to flourish. After this unit, I’ve noticed that without fail, all of my favorite professors the past 4 years have managed to balance passive and active learning, and those I didn’t enjoy learning from relied solely on passive learning strategies. The concept of passive and active learning has been affecting me positively and negatively for years without my knowledge. Now I know these concepts, hopefully I can use them to my advantage during my time both as a student and as an educator. 

Active Learning and Multimedia

I decided for my active learning multimedia project that I would take my previous powerpoint and add review questions throughout, to test the viewers understanding of concepts as the video played. I tried to avoid simple yes or no questions, and attempted to get the viewer to engage with the material in order to know the answers to the questions, hopefully I was able to successfully do just that. 

I’m hoping that the inclusion of these review questions will allow viewers the time to create connections about the topic in their heads and apply the ideas to real life situations. I’m also hoping the questions allowed learners to draw comparisons to other forms of etiquette, like that which is performed in person. 

Principles of instruction

As someone not in the field of education, I had never heard of Merrill’s First Principles of Instruction. Though, while I was reading through the content in this module  I realized that once again the professors whom I have enjoyed learning from the most during my time in university consistently built their lesson plans off of the principles. One such professor I had for a class about algorithms started by teaching us the basic terminology for algorithmic structures, then she assigned us work creating and labeling an algorithm used for an automatic door, she then used class time to demonstrate common algorithms like the one we had made. We were forced to use our knowledge of the real world (how does an automatic door work algorithmically?)  and make connections to the terminology through our assigned work. She reiterated what we had learnt the following week in class by giving us more real life examples, time for discussions between topics, and demonstrations using student participants. Even though I took this class over a year ago I can still remember core concepts. 

Knowing what I know now about instructional design and active learning I will be altering how I design and think about my teaching processes in order to create better learning opportunities for my students and meet my goals as an educator.

Assignment 2: Video for a Learning Purpose

Below I have attached my educational video about the differences between downhill and cross country skis:

Script for above video

Video Script For: The difference between downhill and cross country ski’s

*Start with me standing in front of the camera with no props

Hello and welcome to an in-depth video about the differences between downhill and cross country ski gear. My name is Yasmin and I will be your host today!

To start, there are mainly two types of skis utilized on ski slopes here in North America, there is the downhill ski, and there is the cross country ski. Yes, there are technically in-between types of skis, but today we are just going to focus on the two most utilized ones. Although these are both technically ski’s they cannot be interchanged, so today we’re going to get into why that’s the case. 

*Cut to me holding a downhill ski, will be pointing to parts as I talk about them

To start, let’s talk about downhill skis.

Downhill skis consist of two parts, the ski and the binding. 

Ski bindings are utilized to clip both the back and front of the boot into place so the skier has full control of the entire ski, they consist of a heel cup, where the heel is placed, a toe cup for the front of the foot. They also have a brake pedal, a device which stops ski’s from sliding when they are not in use. 

Bindings also have a DIN,  which is a gauge at the toe of the binding which measures how much pressure is necessary for a skier to excerpt, on the sides of the skis for the boot to pop out, this is a safety measure in place to stop ski’s from harming the user in the case of a fall. 

On the ski itself there is the top side, also called the deck, and the lower smooth side. The smooth side is often waxed. Different waxes need to be applied to the underside depending on the temperature of the snow in order for the skier to have the least amount of friction. 

There is also a sharp metal ridge alongside the ski called the edge, this is what skiers use to “carve” or turn over the slope with. 

Towards the front of the ski is called the tip, the middle is the waist and the back is called the tail.

*Cut to me holding a cross-country ski, will be pointing to parts as I talk about them

Next we will cover cross country ski’s. 

Cross country skis also consist of two major components, theres the binding and then the ski.

 Visually we can see that the ski is a lot thinner then a downhill ski, it’s also a lot taller. 

Furthermore its design is a lot simpler all around as well.  

The binding on a cross country ski is nothing like a downhill ski, instead it consists of a simple metal bar, which clips directly into a persons boot at the toe. The back of the boot is not clipped into anything, these differences mean the ski has no DIN or break feature unlike it’s downhill cousin. 

Cross country skis also have a waist, and tail portion, but the end out the front is not called a tip and is rather referred to as the shovel, distinctions for cross country skis between the shovel and tail are not important, as no cross country ski is ever “twin tipped”. 

Cross country ski’s also consist of a deck, and a base. 

Cross country skis require, just like their downhill components waxing, this wax also need to be temperature specific. But instead of their use being to limit grip they are used to create the correct amount of friction needed for the skier, as cross country is done on flats rather than on consistent downhills. This also means that the ski’s have something called “fish scales” on their lower side or the base, which increase grip alongside the wax. 

Cross country skis also have no metal edge, which makes sense as they are not used to make turns, and are rather used to propel oneself forward. 

*Cut to me with no props

And that’s all! I hope you found this video informative about the differences between downhill and cross country ski’s! 

I hope to see you again as I make more educational content about skiing. Thank you!

Storyboard for the above video

Reflection

What is the learning purpose of your video?
The learning purpose of my video is to teach prospective skiers the differences between cross country and downhill ski anatomy.

Why is video a good medium for this learning purpose?
Video is a good medium for this topic because it allows the viewer to see the ski in real time as I direct their attention to each part of it. It also puts into perspective the differences in shapes and sizes between the skis and their components in a way that images alone would not be able to properly convey.

Which of the principles we’ve covered this term (e.g., Mayer/Universal Design for Learning/Cognitive Load Theory) did you incorporate into your design and why?
I attempted to utilize Mayer’s coherence principle and remain focused on the topic of comparison at hand. I also tried to keep the video short and to the point, aiming for about 5 minutes of runtime in order to satisfy Mayer’s segmenting principle and retain my viewers attention. Finally, I attempted to keep the video conversational in tone which would be Mayer’s personalization principle in action to humanize myself.

What was challenging about capturing your own video?
I found that both the audio and visuals aspects were hard to capture for this video. I do not have an especially amazing microphone or camera, and there were times when I was recording that the video would become corrupted and I would need to start again. Luckily I had enough good footage to create my final product, but my technical difficulties were by far the my biggest hurdle during the creation of this video.

What did you find easiest?
The part of this process I found the easiest was creating the script. I am an ex ski coach and a lifelong skier, so this is a topic I’m really passionate about and have a vast amount of knowledge on. Thus talking about the components of these ski’s came as second nature to me.

How would you approach capturing video differently next time?
Next time I think I will stand closer to the camera while recording. During my editing in post there were more then a few times I needed to crop my screen so I would be taking up more of the picture. I would also like to change the background so there are fewer distractions in the frame at any given time. Also, I’d like to incorporate more visual and onscreen aids to cement my videos points. The last thing I would change is to upgrade my microphone and camera for future recordings, so hopefully I have fewer technical difficulties.

Module 3 – Reflection

In this module I was tasked with understanding learning through storytelling. I was reintroduced to the learning concepts around accessibility and teaching effectiveness, and given additional information on what makes a story compelling and engaging for learners so they can best absorb information. There is quite a lot more to efficient storytelling then I had first perceived there would be. Let’s dive into what I learnt about the art of learning through story. 

Storytelling

Before this module I hadn’t really realized how big of a role storytelling played in my own learning, I had always viewed myself as a visual learner in need of being shown practical examples in order to learn things, I realize now that I had nearly entirely discounted the words necessary for the visuals to be engaging and inductive to learning in the first place! Looking back on my highschool and university education I started to pinpoint the times when I had most retained information, often there was a story being told to go alongside the visual aids. Be it a personal anecdote or an entirely fictitious one, I’ve come to realize that the methods discussed in this module such as the humanization of the speaker, building of relationships with the audience and implicit messages aided in my learning and retention to a great degree. I was able to better utilize what had been taught if I had been taught it through storytelling. I was able to remember many more details and, by far, hearing someone’s journey allowed me to make connections to my own journey and experiences in a sense which only further cemented the points they wished to make. 

I recall a story which has stuck with me since I was a small child, about the dangers of crocodiles in Australia. The storyteller was talking about his own experience with crocodiles and how they very nearly took his life. The entire lecture was in a video format with animations to go along with the speaker’s story. I recall learning that day not to go too close to the water on riverbeds and to never go out walking alone, it’s a lesson someone else learnt that has stuck with me to this day. 

Keeping with the topic of my learning during this module, I realized that I had greatly underestimated the value of the human imagination during storytelling. Until it had been brought to my attention I hadn’t noticed that the stories I’ve been told allowed my brain to create connections, an example being the mention of blueberries and how I might now without meaning to, be imaging a blueberry, and/or how it might taste or smell. In storytelling visual aids are always a plus, as noted in the “7 Storytelling Techniques Used by the Most Inspiring TED Presenters” article, but I think the learners ability to synthesize the visuals and auditory aspects of learning into something their brains can comprehend and connect to may also be vastly undervalued by the learner themself. 

Twine for storytelling

Throughout the journey to create my twine “Pirate Adventure” there was only one thing I wish I had done differently, that being fleshing out the story component a little more then I had. I did have a rough plan for my story but that rough plan also led to an  issue I had with my twine as I attempted to link so many nodes together in different ways. Luckily I was able to rectify the problem, and I have attached a link to my completed twine below! If I do end up creating another twine in the future, I think I’ll write out the story from start to finish with all of the nodes accounted for instead of allowing new ideas to manifest themselves as I create the twine and tangle the logic.  

https://zxmx2npq.play.borogove.io

Educational Videos

With the advent of easy to create and accessible video creation platforms and our knowledge of how storytelling impacts learning, I can see why so many professionals are turning to the medium to enhance the learning of their pupils. Although we should be careful, we cannot underestimate how Mayer’s principles still play a part in our learning even in video form. Mayer’s principles are hidden but still actively utilized by videos intended for learning purposes, such as the use of segmentation in keeping viewers attention with short bite sized informative segments, the use of a focused narrative throughout as to not lose the viewer, utilizing visual elements and the inclusion of accessibility principles. I’m hoping that the video I created about the difference between country and downhill skis managed to do a good job of utilizing these principles while remaining engaging, although I fear that I may have tipped the balance between the use of Mayer’s principles and natural engagement at least a few times. 

I had prepared a rough storyboard about what I wished to talk about throughout my video, but I fear my lack of specifics may have left room for errors in how my video played out. I know now that when creating a video storyboard that I will need to be more specific in my intentions so I can avoid going off track or missing points I want to make that are integral to the video. Hopefully I can learn from this and create even more polished creations in the future!

Below is the storyboard I created for my educational video: 

My video will be posted as it’s own blog post with a separate reflection titled Assignment 2 – Video for Learning Purposes. 

Knowing what I know now I’ll be utilizing storytelling alongside educational videos more often when I plan to teach!

Module 2 – Reflection

In this module I was tasked with thinking about the effectiveness and accessibility of my teaching materials, and how the design of these materials can hinder or assist learners during their learning journey. We went over quite a few topics, so let’s dive in!

Accessibility

I had never used text to speech tools before, and I wasn’t aware of them being widely available online. I also never knew the difference between open and closed captioning, or why people without hearing impairments might use them. Now I understand that accessibility tools work to better the world for everyone, like through ramps on sidewalks or banisters on stairs. I like that we discussed solving for one and extending to many in this sense, as more than just disabled people utilize accessibility measures.  

Accessibility goes past the physical realm and into online design as well. We discussed the best design choices for sites to be the most accessibility friendly for text to speech readers and those with visual disabilities, like always including text descriptions for images and giving control back to the learner regarding video playback. As someone who has a mind that tends to wander, being able to go back in videos definitely struck a chord with me, I didn’t even know that was an accessibility feature!

Design Principles and Presentations 

This module introduced me to the nature of the human brain when it encounters certain design elements. In presentations and in infographics we were told to focus on our alignment, reduce contrast (or use it to our advantage), utilize repetition, always consider proximity and leave lots of negative space. I realized that in my first module screencast I had broken more than a few of the design principles, as well as the presentation specific principles like keeping one idea per slide, having no more than one idea on each slide, and having a larger title than the written content on my screen. For the final project I will definitely be focusing on these areas more. I tried to utilize the design principles while I was creating my infographic for this module, I focused particularly on my use of negative space, contract and repetition, hopefully I was successful in creating something that is easy to read and remember. 

I have attached my infographic about Antioxidant rich foods below. 

Alt-text Infographic about Antioxidants: This infographic talks about what antioxidants are and what foods are antioxidant rich as well as their the specific antioxidant names found in each food.

A transcript of the infographic is as follows:

The first box “what are antioxidants” says “Antioxidants are naturally occurring chemicals that protect human cells from free radicals caused by pollution. By protecting cells from harm, antioxidants help to reduce the risk of chronic diseases! Many foods provide antioxidants. The best sources based on their antioxidant ratio’s have been listed below.” with an image of a woman beside it. An image of a coffee is below the box of described text. The image of the coffee has another box beside it with a title “Coffee” and text that reads “Coffee is high in an antioxidant called cholorogenic acid. This powerful antioxidant is known for it’s weight loss and blood pressure regulating properties.” below this textbox is an image of a chocolate bar. Next to the chocolate bar image is a box with the title “Dark Chocolate” and the text “Dark chocolate contains several antioxidants such as catechin, anthocyanin and proanthocyanidin. These compounds have been associated with cardiovascular health and blood pressure regulation” Below this text is an image of blueberries. Next to the blueberries is a box with the title “Blueberries” and the text “Blueberries are high in anthocyanins, an antioxidant that has been associated with lowering blood pressure, good cardiovascular health and healthy urinary tracts.” below this textbox is an image of cinnamon. Next to the image of cinnamon is a textbox with the title “Cinnamon” and the text “Cinnamon is high is a compound called cinnamaldehyde, which has been praised for it’s anti-inflammatory properties”

WAVE accessibility checker

When I checked my last blog post against the WAVE accessibility checker I was surprised by their results. There were contrast errors I wasn’t aware of because I myself had missed the text while reading! The WAVE site also highlighted my video as an error as it’s a “video/audio” component. After going through this module I now realize why it highlighted this as a problem, my video does not include closed or open captioning, making it a poorly accessible resource. Furthermore, the embedded video does not have embedded information in the case of it being  unavailable for any reason, meaning that if a person with a screen reader attempted to read through the page they may not even know that a video was embedded. 

I’ve attached the WAVE results for my last post below:

Alt-text Image of the WAVE (Web accessibility evaluation tool), image shows the WAVE accessibility tools scoring on the left and on the right is Yasmin’s module 1 blog post.

Text to speech screen readers

 When I tried the natural reader site I was surprised at how human the text to speech sounded. I will definitely be making use of this tool in the future as I do have a habit of allowing my mind to wander while I read, and getting stuck in a loop of reading the same sentences over and over again. I also tend to read quite quickly, so I think this tool helped to slow me down a little and hopefully absorb more of the information. 

Knowing what I know now I’ll be on the lookout for more accessibility features and how I might utilize them on a day to day basis, as well as how I might incorporate them into my work so my designs and thoughts can be conveyed to everyone!

Module 1 – Reflection

In this module we were introduced to Mayer’s cognitive theory of multimedia learning which outlined how we learn. We then used these principles of learning to formulate the ways in which we can optimize learning! We discussed how our design choices in particular influence the learning of our audience and how we can reduce what impedes learning in our teaching materials, so as to communicate our thoughts in the most conductive to learning way possible. Let’s jump right in!

Mayer’s Cognitive Theory Concepts

This module went over Mayer’s cognitive theories core concepts like: 

  •  The Dual Coding Theory: Where Mayer theorized that we have two systems for information input, our eyes and our ears, and that no one system should be overloaded for optimal learning 
  • The Limited Capacity Theory:  which theorized that our working memory has limitations and that overloading the limitations would cause poor learning to occur
  • Active processing:  the theory that active participation from students allows for information to become better absorbed by students. 

Within these three core concepts of Mayer’s theories lie many more concepts that fall into three sub categories each. Each sub category is related to the type of workload the learner and their brain must overcome in order to learn under the core principles. 

The first workload we explored was the extraneous cognitive load. This type of load would cause learners to work harder to understand the information the teacher was presenting them due to the work included in deciphering the content, this type of load is amplified when too many listening and visual components are used, the presenter goes off topic and when images and words are too far from their context in a presentation. 

The second workload was the intrinsic load, which focussed on the concepts to be learnt by the learner, and how we can make it easier for them to learn through segmenting the information, building on information throughout the learning process and our narration. 

Finally there was the Germane load, which is the load which describes the perfect level at which a learner will both understand new things and retain information. Germaine and intrinsic loads should be built upon using Mayers principles, while extraneous loads should be minimized. 

Of all of the principles of Cognitive Theory and Multimedia Learning in this module the one I found most intuitive was the redundancy principle. The redundancy principle made the most sense to me because I have had first hand experiences in being overwhelmed by text, pictures and narration during presentations. To add to that, I was very interested in the dual coding theory by Allan Paivio, whereby he suggested that the brain had two systems for information input, visual and verbal. Allans theory resonated with me as I recall times when presentations I’ve seen showed pictures or limited text with narration and I was able to recall information about them later far easier then if they had both text and narration. I guess less really is more! Conversely, out of all of the principles I was definitely most surprised by the pretraining principle, I had never thought to build up the information in my presentations rather then show all of the information at once, I can see how that would allow learners to more easily connect concepts now that I have attempted to utilize it myself in my screencast.

Screencasting

Below I have attached my screencast about professional netiquette for this module, I hope you enjoy!

While creating my screencast I imagined that my audience was a group of young professionals looking to learn how to professionally and politely interact with one another online! I choose to keep my design simple and to the point as this presentation is for a professional audience, I also decided to explore professional modes of online interaction so it further connects with my desired audience. 

During the creation of my screencast I found that it was hard to balance Mayers principles and the content I wanted to show. I had a lot to say about this subject but I didn’t want to overwhelm the viewer with my narration, on screen text or visuals all at once. I hope that by utilizing the pretraining principle, reducing redundancy and segmenting my information into bullet lists I was able to build the information up for my viewer coherently. An unexpected hiccup for me during the creation of this screencast was my timing for narration, in the past when I have had text on the screen to read directly off of I haven’t had to think about when I might want to say something between bullet points or on screen visuals, this was definitely a hurdle for me, but I hope to get better at it before the final presentations are due!

A Little About Me!

Hello and welcome to my blog!

My Learning Pod Self Reflection:

What is your preferred mode of remote communication?
I prefer remote communication over discord.


What are your communication strengths?
I reply quickly to online messages!


What are your communication weaknesses? Where would you like to grow?
During communication I sometimes go off topic, I would like to get better at keeping the topic at hand at the forefront of academic communication.


Do you consider yourself an introvert or extrovert?
I consider myself to be an ambivert! Sometimes I feel outgoing, other times I feel more at peace by myself


What time of day do you prefer doing academic work?
I prefer to work during the morning and into the early afternoon.


When you are upset do you tend to share this with others or keep it to yourself?
When I get upset, I tend to share that with my peers.


What do you like about group work?
I like that while working in a team I get to explore novel ideas I might not have thought of or explored otherwise.


What don’t you like about group work?

Poor communication can be a problem and can get in the way of progress.


What else would you like your team to know?

I look forward to working with you this semester!

© 2025 Yasmin’s Blog

Theme by Anders NorenUp ↑